Hello there and a happy Saturday to you!
I'm up on the Sonshine Stamp Company Blog today with a card using the Happy Mail stamp set. This 4 x 6 is loaded up with adorable images that can be used on cards, envelopes and even inside your planner.
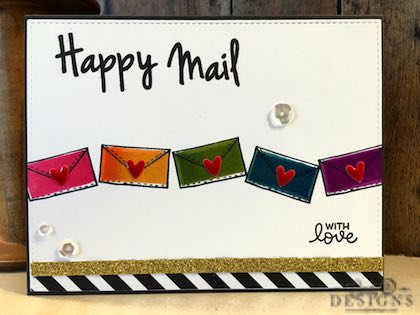
As usual, I kept this pretty clean starting out with a piece of Papertrey Ink Smoky Shadow card stock cut to a top-folding landscape A2-size card. I layered on a piece of Stampin' Up! Whisper White card stock cut from My Favorite Things Blueprints 15. I cut a sliver of black and white diagonal designer series paper from the Stampin' Up! Neutrals 12 x 12 Paper Stack and also ran that through my Big Shot with Blueprints 15 to keep the stitch detail cohesive with the Whisper White panel. I cut a very small piece of Gold Glimmer card stock, also by Stampin' Up!. I sized up and made a pencil mark on my Whisper White card stock to help me with the placement of my stamping then set both of those pieces of card stock aside while I worked on my main images.
I used my MISTI and stamped 5 envelopes with Memento Tuxedo Black Ink in various orientations across the card stock. In the stamp set, there is a filler stamp for my envelopes. I grabbed my Hero Arts Ombre Inks in ROYGBIV and started from left to right. I was wondering why the filler stamp did not fill my envelopes all of the way, but continued to stamp anyway. At the last envelope, the stamp would not stick to my MISTI. After taking a closer look at it, it was hard to tell that I had the stamp upside down. In other words, I was stamping with the backside of the stamp. This was another save project where after orientating those envelopes, I was not going to start all over. This also explains why I wasn't getting the ombre look I was after. The filler images is pretty small that it is difficult to get the full ombre. I then turned the stamp over and re-stamped the inside of my envelopes again and that's where you can see around the edges of the envelope my happy accident that allowed me to get some ombre in there. The orange envelope turned out great. I debated on whether to use a Clear Wink of Stella Glitter Pen to color in the envelopes for some additional bling, but wasn't going to push my luck anymore. I then stamped my sentiments with Papertrey Ink Smoky Shadow Ink, added the accent card stock and a few clear sequins in 4, 6 and 8 mm size from Pretty Pink Posh with Ranger Multi-Matte Medium. I adhered the image panel to the base of the card stock. The envelopes looked pretty boring to me so I decided to tie in the "with love" sentiment and went hunting through my Doodlebug Sprinkles and found the perfect embellishment for my envelopes in the Ladybug Assortment. Since there is already adhesive on the back of the hearts, I centered each heart and that completed the card.
Thank you so very much for stopping by to visit me today and I hope you have a great weekend! God bless.