Hello there. Yesterday I posted my usual Clean & Simple Tuesday card that’s received a lot of positive feedback on my IG.
Today’s card is for the Paper Craft Crew Mid-Week Inspiration. We usually post the challenge on Wednesday, but due to Hurricane Matthew, Pam had extended the challenge for 2 weeks. Have you seen our new blog look?! It’s so clean and cool. I absolutely love it! Fortunately, all of my friends so far are okay as he decided to take a little right hook at the last second. I’m hoping he doesn’t whip around for a 2nd time as predicted to be a tropical storm. Then there’s Hurricane Nicole coming, who unfortunately will be a direct hit to Bermuda, but she’s not expected to hit the eastern seaboard. She can stay out in the Atlantic.
When I saw this card by Yana Smakula, I was immediately inspired to ink up the new Paisleys & Posies stamp set from the Stampin’ Up! 2016 Holiday Catalog. This stamp set has had me stumped now for weeks as to what to make with it. I’ve seen beautiful examples all over the internet, but Yana’s card really caught my eye. Even though she used completely different products on her card, I was able to replicate it Stampin’ Up!/Cindy style and it turned out beautifully! This is also a great masculine card. I’m back on my LOVE thing again. If you think about it, this would also make a fabulous Valentine’s Day card. I have little gold heart sequins on this card too. It is very unconventional, but that’s half the fun. In the thinlet die set that I used, there is a “love” die-cut too. Lots of possibilities!
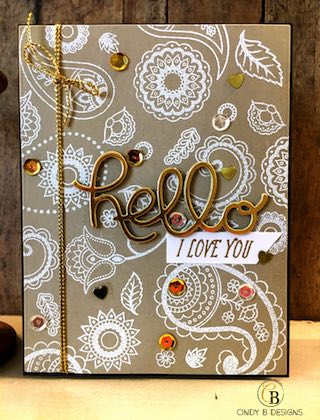
My card base is an Early Espresso A2 side-folding portrait style. I then cut a piece of Crumb Cake card stock to 4-1/8 x 5-3/8. I used my Embossing Buddy all over the Crumb Cake card stock and placed it inside my MISTI. I took every single image stamp in this set and arranged them on the Crumb Cake card stock, picked the stamps up with the window of my MISTI, inked them up with Delicata White Shimmer Pigment Ink, stamped the images onto my card stock, sprinkled white embossing powder over the top, tapped off the excess and then heat embossed the entire panel. I went back in two more times to spot fill with images so I had a nicely stamped background. Despite this image panel undergoing a lot of heat 3x, I had absolutely no warping at all and was extremely surprised that my 80 lb. card stock held up like that. The only thing I did different was use pigment ink to bind my embossing powder to the card stock instead of water-based Versamark. I’m really not getting this, but am very happy with the end result. Once the image panel had cooled off, I used a Swiffer cloth to wipe off the excess anti-static powder from the Embossing Buddy and set it aside.
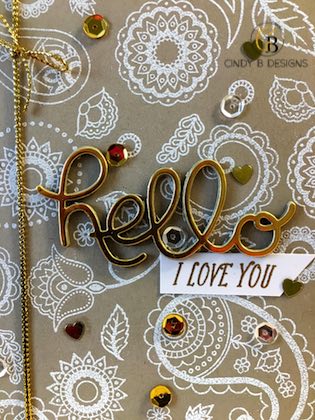
I die-cut the “Hello” from the Hello You Thinlets 4x from Brushed Gold card stock and 1x from Gold Foil card stock. I kept the negative from one of the dies and placed the die-cut back into it, then adhered them all on top of each other with the Gold Foil on top. This helps you align up the dies perfectly. I used Tombo Mono-Multi Liquid Adhesive to adhere my dies together with little dots so the glue didn’t ooze out. If liquid glue gets onto your Gold Foil, it looks awful and you have to cut another piece. Using liquid adhesive when stacking dies allows you a little wiggle room before the glue sets permanent. This gives your die-cut sentiment great dimension.
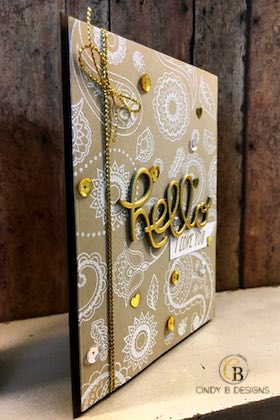
I cut a piece of white fun foam to fit behind my image panel. I didn’t mind using white this time since my image panel was predominantly white. Usually, I will use a colored piece of fun foam that coordinates with my card so it looks nice from the side. I adhered the fun foam to my card base. I wrapped Gold Cording Trim around my image panel a few times and did a cheater’s bow at the top left. I then stamped the “I Love You” sentiment from the Banners for You stamp set onto Whisper White card stock with Delicata Golden Glitz Pigment Ink after treating it with my Embossing Buddy, sprinkled gold embossing powder onto the card stock, shaking off the excess and then heat embossing that as well. I trimmed down the Whisper White sentiment panel to the size I wanted and snipped off the right side with my Paper Snips and adhered it directly to the image panel with adhesive after I sized it up a bit to see exactly where I wanted the placement. I then added drops of Tombo Mono-Multi Liquid Adhesive to the back of my “Hello” die-cut and adhered that directly to the image panel. I arranged various clear and gold sequins onto my image panel and adhered them down. I added adhesive to fun foam that was already on the card base and placed my image panel on top watching my alignment and this card was done!
I hope that you enjoyed today’s card and we can’t wait to see what you make for our challenge this week!
If you are interested in any of the products that I used to make my card, please visit my online Stampin’ Up! store or click on the links below.
Thank you so very much for stopping by to visit me today and God bless.

Product List
|
Brushed Gold 8-1/2″ X 11″ Card Stock
|
|||