Hello there and a very happy Friday to you! The weekend is finally here! Please hop on over to my IG page where I have announced the winners to the Kabuki Brushes. I’ve been receiving a tremendous amount of emails that I appreciate and am so grateful for, but I have 1028 emails sitting in my inbox…I know, pretty pathetic. With my new blog, I’ve decided to go to a Contact Form. This ensures that when you do contact me, it will go straight into a special folder in my email inbox rather than it getting lost in my regular email, which I’m working on cleaning up, moving emails to folders and deleting a lot of them. There’s no better feeling than an empty email inbox. The thought of it makes me giddy happy excited.
I’ve had a very good response to my craft room purge and will be filming my last box of Paper Smooches tomorrow. After that, we will be moving on to The Stamps of Life. This purge is going to take me a very long time! I’m trying to simplify my life and go minimalistic, which I already have done in my house and I have to tell you that it feels great not having so much stuff!
Onto my fun card now. I found a new challenge on IG of the Fusion Card Challenge. You have options with this challenge of either doing the sketch, theme elements or both.
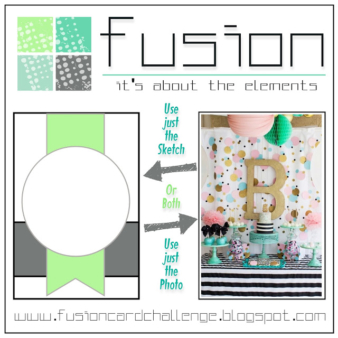
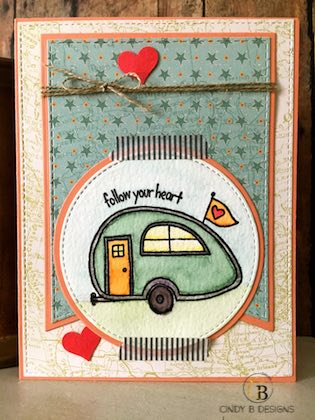
This time, I just used their sketch and I was determined to use the You’re Sublime stamp set by Stampin’ Up! My image is watercolored using Stampin’ Write Markers that I scribbled onto a clear acrylic block and picked the color up with my Aqua Painter. I used Papertrey Ink card stock of Melon Berry and Road Trip patterned paper. Of course, my MFT Stamps Die-Namics played an integral part of my card with the stitch detail, as always. I don’t like smushing my Stampin’ Up! ink pads in the lid to get my color. I’m too OCD for that, which is why I scribble the markers onto acrylic blocks and grab the color from there. I used 8 markers on this card!
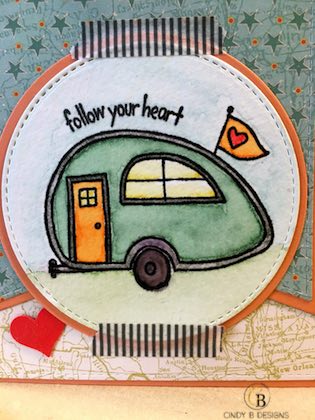
The image circle is die-cut from MFT Stitched Circle Die-Namics. From the bottom of the camper, I watercolored that with Wild Wasabi and for the sky, I used Soft Sky. The camper was colored in with Mint Macaroon, Peekaboo Peach, Smoky Slate, Basic Black, Watermelon Wonder and Daffodil Delight.
I used my Wink of Stella Clear Glitter Pen for the heart on the flag on back of the camper that I watercolored in with Watermelon Wonder and then punched out 2 hearts using a Stampin’ Up! heart punch Watermelon Wonder card stock and glittered them up as well to tie that element of the card in using the visual triangle/Rule of 3s.
I’m still awaiting some graphics, so I do not have my usual Supply List, Instructions, numbers or signature line yet. We’re getting there. I think Brian, Nicole and myself have blog burnout right now 🙂
I first tried using Tim Holtz/Ranger watercolor paper, but it just did not work for me at all. I used Memento Tuxedo Black and then Versafine Onyx Black, and both smeared all over the place. Companies formulate their inks to work with their products and distress watercolor paper is best when you want to use Tim Holtz Distress products.
I started out with a side-folding A2 size Melon Berry card base by Papertrey Ink. All of the patterned paper is by Papertrey Ink Road Trip. I layered on a piece of patterned paper after die-cutting it with MFT Stamps Blueprints 15. This card is very consistent in that my matting layers has no stitch detail, but the top layers do have stitch detail. I die-cut an MFT Stamps Fishtail Banner Jumbo STAX from Melon Berry card stock and an MFT Stamps Fishtail Stitched Jumbo Banner from my patterned paper. I did not use any foam adhesive or any type of dimension on this card at all since I already had 3 layers. I adhered everything with regular adhesive. A few of the elements needed full coverage adhesive and I used my Xyron Creative Station Lite. Such an awesome tool that completely covers the back of your image. I then cut my watercolor card stock from Stampin’ Up! and stamped my image with Versafine Onyx Black, heat set it real quick, and colored the image in with the markers listed above. I was extremely taken aback and surprised that I do not own MFT’s basic circle die-cuts, so I went to my Stampin’ Up! dies and it worked out perfectly when I had to die-cut the Melon Berry layering panel.
Stampin’ Up! has retired their Circle Collection Framelits, but keep them! They also work perfectly with the new Circle Layering Framelits. This is a prime example of why I keep those types of die-cuts, even though they are “retired.”
Below are pictures of my adorable card. I will generate a list of supplies on Saturday. It’s 6 pm now on Friday and time for me to leave the craft room. Have a fabulous weekend and I will see you back tomorrow updating this post and for the Paper Craft Crew Mid-Week Inspiration!
Love it!
Your holiday trailer is absolutely adorable; I’m ready to pack my bags and go on a road trip! The striped washi and little hearts are charming special touches. So thrilled you shared this at FUSION! Your purging and reorganizing sounds ‘freeing’; I need to think about doing something similar!
~carol