Hello there y’all! Today I have a flat shaker card for you using Best Birds, which is another sleeper set that I neglected over Christmas and could have been used for some wonderful winter scenes. The birds are drawn for any season allowing the colors that we choose to define the image. We all know that shaker cards are fun for any recipient to receive and to make.
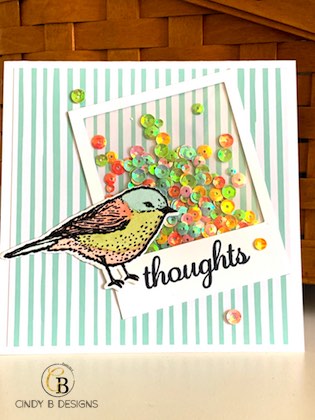
I decided to watercolor this image in Balmy Blue, Calypso Coral, Pear Pizzazz, and Petal Pink onto watercolor CS with an AquaPainter and Frost White Shimmer. I wanted to go with a spring color palette that would coordinate with the Iridescent Sequin Assortment for this 4-1/4″ square top-folding card.
I started out with a Thick Whisper White card base and layered on a piece of Balmy Blue Subtles stripped DSP. The bird image was stamped with Memento Tuxedo Black and coated with clear embossing powder and heat set. You always want to use your Embossing Buddy to protect your image from stray embossing powder. After coloring, the image was set aside to dry. I prefer to let natural drying occur rather than heat set in most instances. I find my color stays more true. I also stamped and watercolored the large branch to adhere to the inside. After the images were dry, I adhered part of a Multipurpose Adhesive Sheet to the back of the watercolor CS, burnished it in, then die-cut the branch and bird out with their coordinating framelits. And yes, I did perform surgery on the sentiment. Do not fret about doing this. You get more more mileage out of your supplies to customize your project mixing fonts, phrases, and sets.
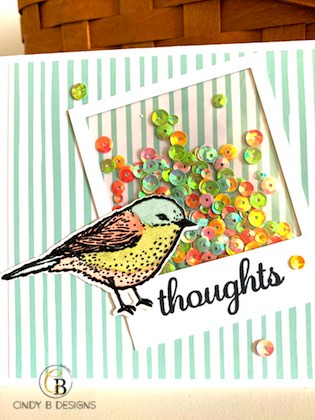
Stampin’ Up! does not have a picture frame die-cut, so I made one myself. I chose the Layering Square that I wanted to use and made sure that I cut the CS 1/8″ on each side to accommodate the Tear & Tape Adhesive. This is a must use for shaker cards to keep the contents in. I purposely left the bottom a random length to add my sentiment and then trimmed.
How I built the shaker is easy enough and I’m definitely adding that to my video list to make. I did use a heated Fuse Tool to heat bind the edges of a sturdy plastic pouch together in order to customize and fit my frame. This is really very easy to do. I added my sequins, heat closed the pouch, and then adhered to the front of the card.
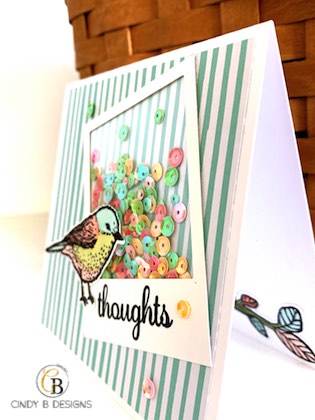
As you can see, I still have a lot of shaker sequins from the side, but it lays flat on the card. you can see a part of the branch on the inside of the card at the bottom.
I hope that you enjoyed today’s project and thank you so much for stopping by for a visit. Have a great day and God bless.

So pretty! I love the colors for spring! Shaker cards are so fun to make and to receive!