Hello there! Thank you for joining me today for an introduction to the Sending Smiles Bundle, Fabulous Frames Dies + our new In Color of Sweet Sorbet. I also have a tutorial for you as to how I inlay these types of dies so they’re perfect every single time.
I love the large word ‘Sending’ die with a coordinating layering background. The Fabulous Frames Dies have a permanent place on my workspace. Our new In Color of Sweet Sorbet is a fantastic spring and summer color, but I’m looking forward to using all of our tropical In Colors for Christmas. Another new In Color used is Parakeet Party for the greenery.
I also brought in Quiet Meadow for the print image to use as a backdrop on my image panel.
This post is loaded with pictures and a lengthy narrative.
Here is a look at the new products in today’s project with notes.
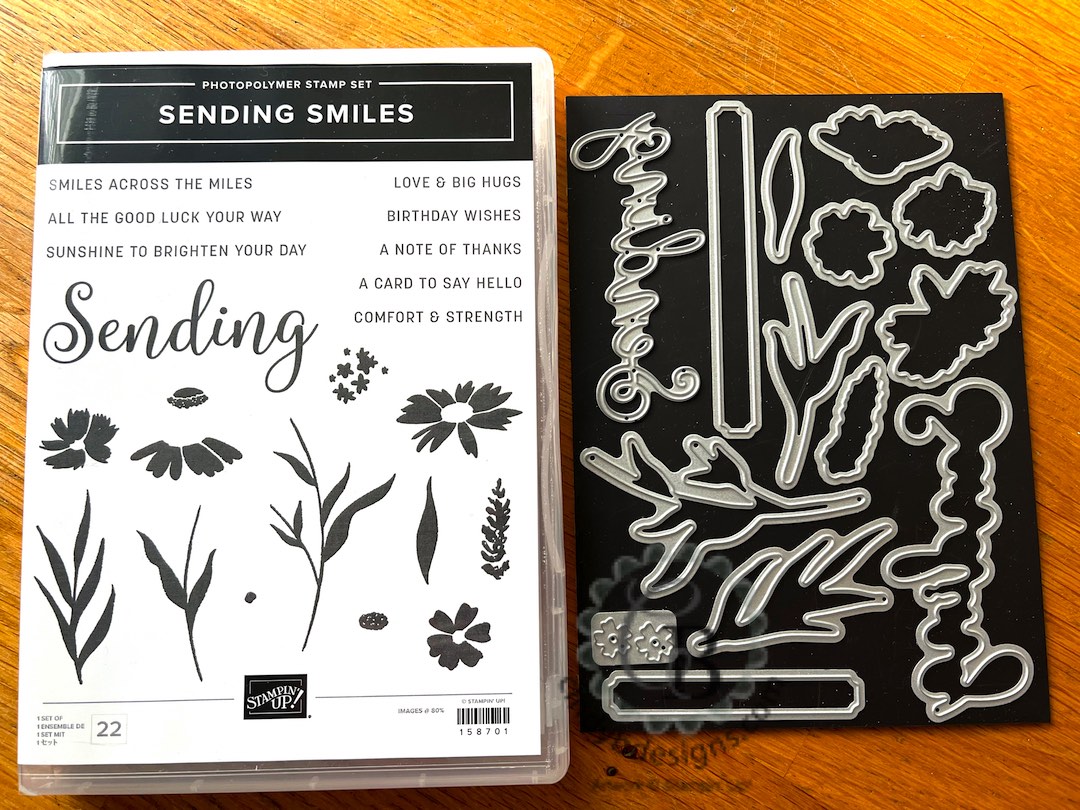
Sending Smiles Bundle – 158707
- 22 photopolymer stamps, Sending Smiles Stamp Set coordinates with Sending Dies.
- 9 image die-cuts, 2 sentiment frames, 1 ‘Sending’ image layering die-cut, 1 ‘Sending’ script die-cut, coordinates with Sending Smiles Stamp Set.

Fabulous Frames Die-Cuts – 159163
- 6 die-cuts, coordinates with Good Feelings Stamp Set.
- The largest frame die cuts a frame and center panel.
As always, your shopping Supplies and Instructions, including measurements, are below.
There’s a lot of various techniques used in this project.
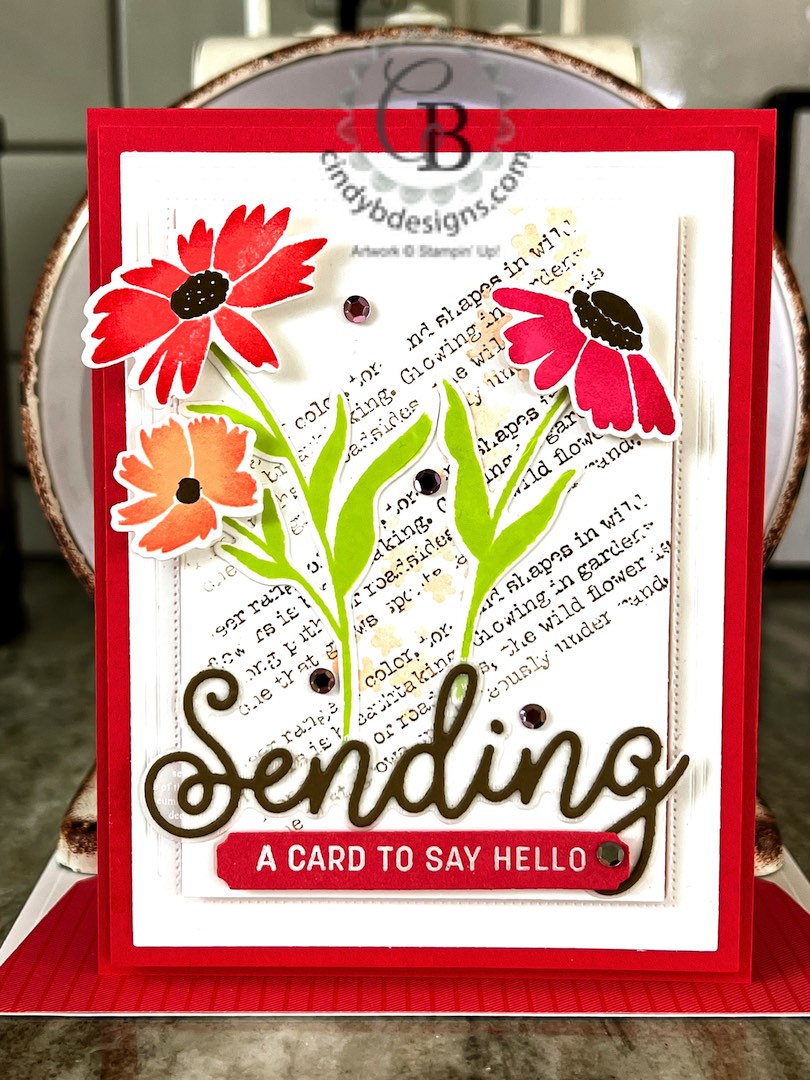
I started out with an A2 Sweet Sorbet card base and cut another piece of Sweet Sorbet for a mat. I die-cut the largest frame from Fabulous Frames out of Basic White CS and adhered the frame to the Sweet Sorbet mat with liquid adhesive. Stampin’ Dimensionals were added to the back of this panel and adhered to the card base.
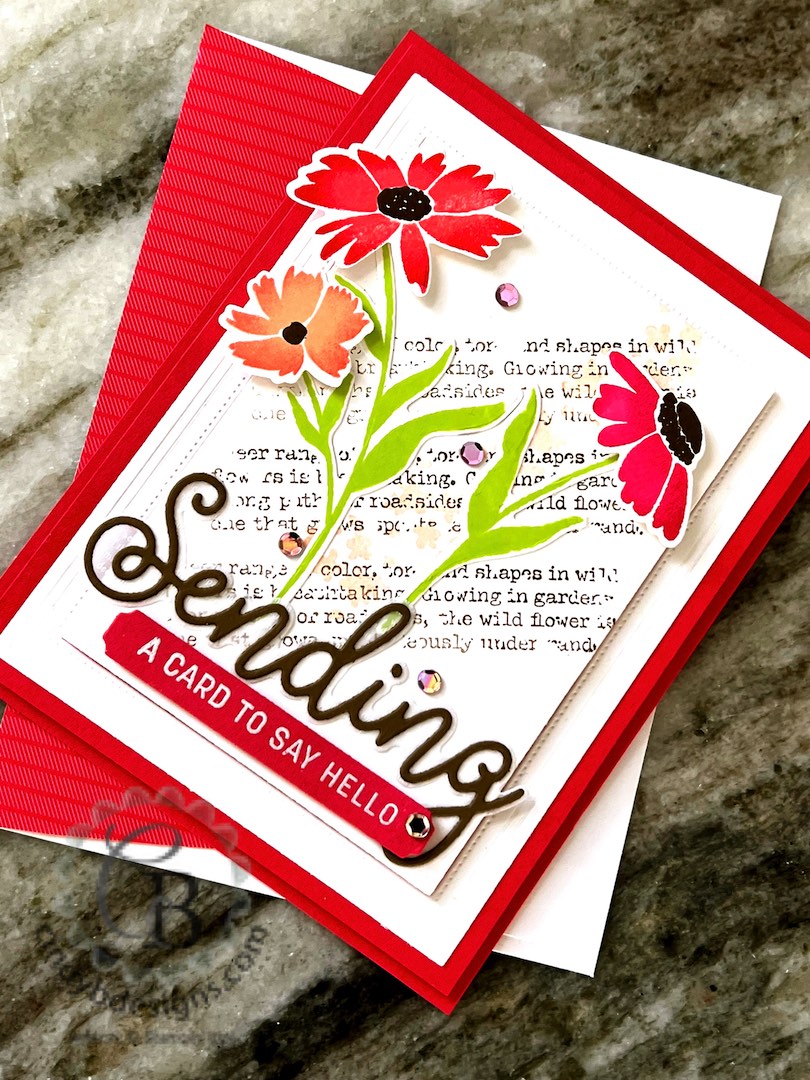
On the image panel, I stamped the small floral cluster from Sending Smiles with Petal Pink stamped off several times from the top right down to the lower 1/3 of the image panel diagonally. The print image from Quiet Meadow was stamped off x3 and 3x in Soft Suede ink tilting toward the left diagonally. I did this because I didn’t want it to look like one giant cluster of a sentiment.
I then set about stamping my images and cut from their coordinating dies in the following colors below.
- Greenery: Parakeet Party.
- Flower stamens: Soft Suede.
- Right flower: Polished Pink with the edge sponged in Melon Mambo.
- Middle flower: Sweet Sorbet with the edge sponged in Sweet Sorbet. Selectively adding a second layer of the same color of ink adds dimension.
- Left flower: Petal Pink with the edges sponged in Flirty Flamingo.
The layering ‘Sending’ die was cut from white print Vellum Layering Designs and the script ‘Sending’ from Soft Suede CS. I have a picture tutorial as to how I inlay these types of die-cuts for perfect placement.
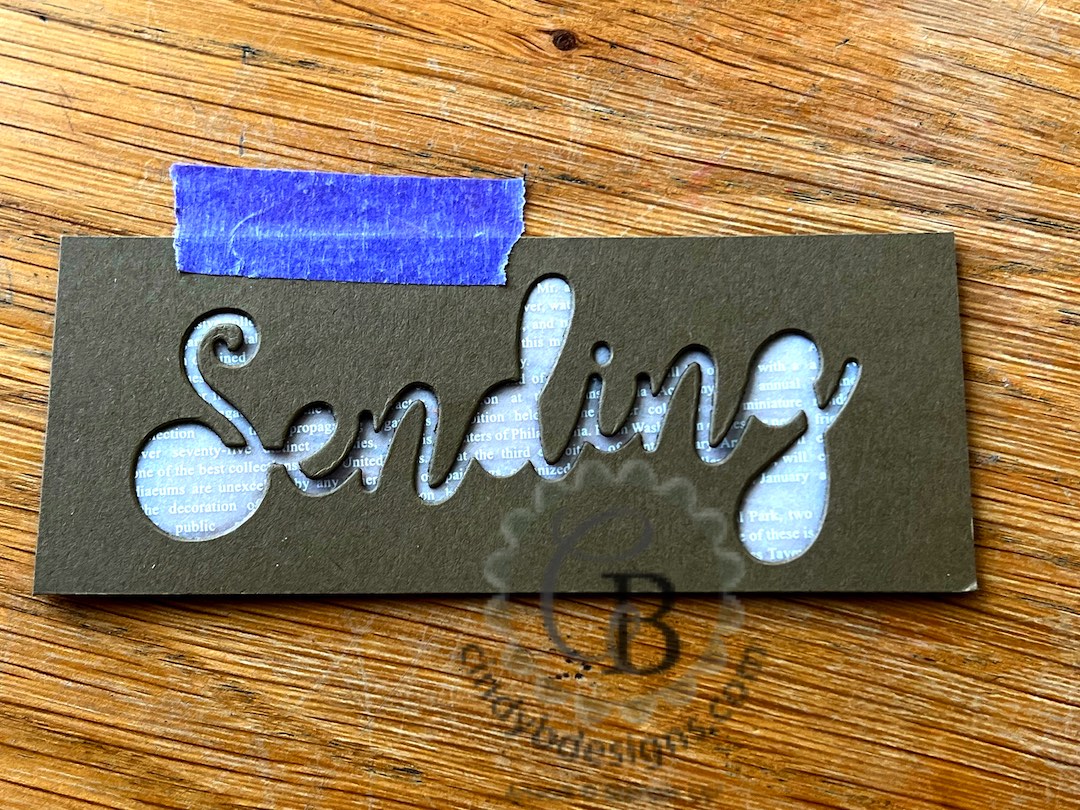
- Cut the script die-cut from Soft Suede CS, which will leave you with a negative image.
- Cut your layering die-cut from white print Vellum Layering Designs.
- Center the vellum under the negative image.
- Secure to your work surface.
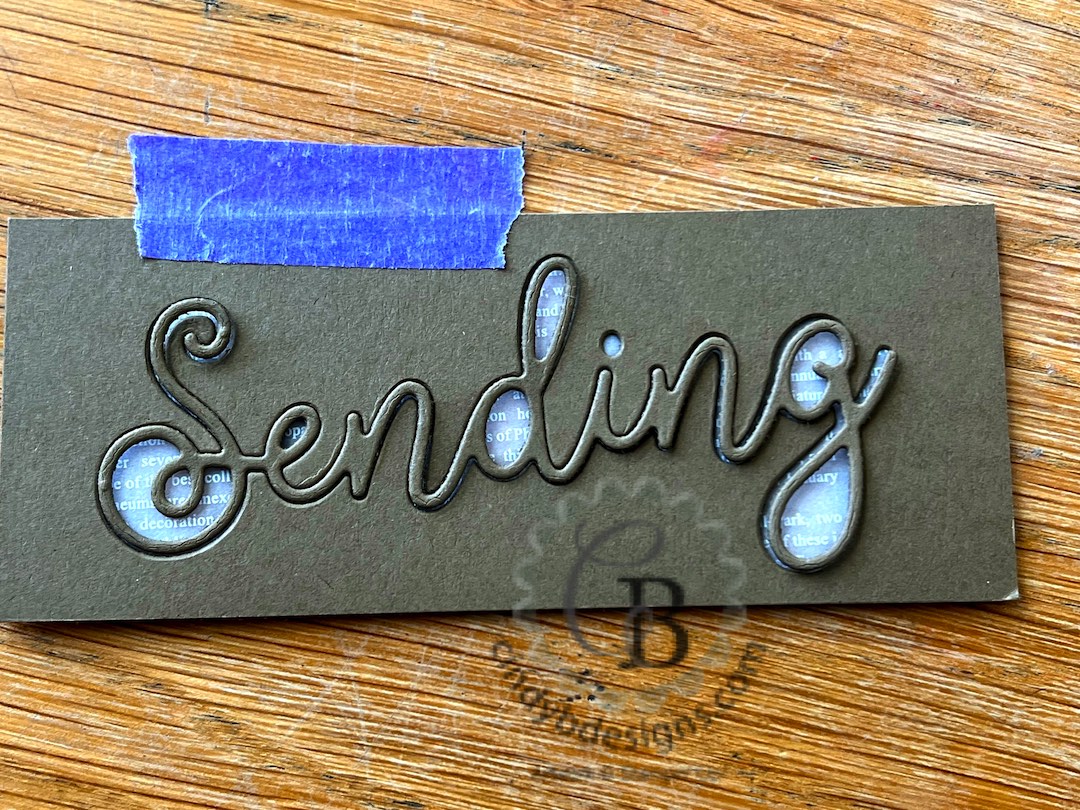
- Add tiny dots of liquid adhesive behind the script cut and inlay into the negative cut.
- Don’t forget the tiddle! ~ which is the dot above the I.
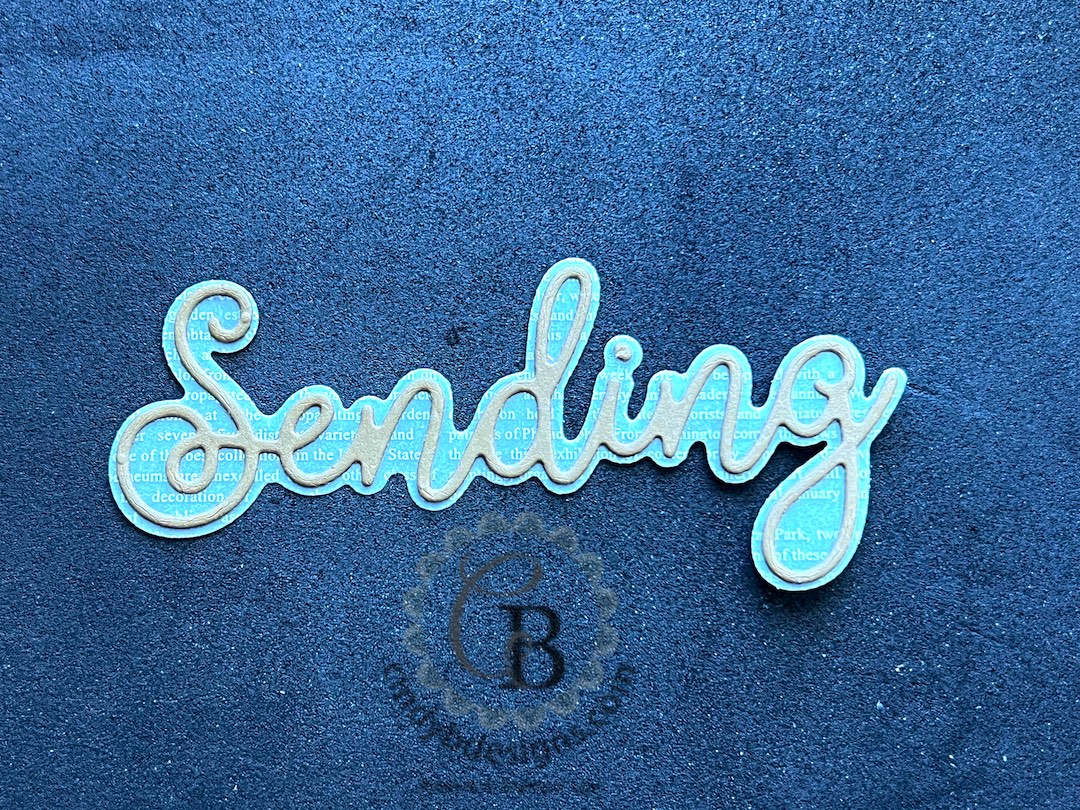
- Gently lift off the negative cut once dry.
The sentiment was stamped onto Sweet Sorbet CS with Versamark ink, heat embossed with white powder, and cut from its coordinating sentiment frame.

For final assembly, I started from the bottom up to lay out my design.
- The sentiment was adhered to the bottom center of the image panel with Mini Stampin’ Dimensionals.
- I laid the completed ‘Sending’ cuts centered directly above the lower sentiment without adhering it to place and adhere the greenery with liquid adhesive. Little glue dots of liquid adhesive was placed behind the Soft Suede script that shows through the vellum on the back and then adhered to the image panel. I did this to cover the bottom ugly of the stems.
- The flowers were adhered with Stampin’ Dimensionals.
- The image panel was inlayed and adhered inside the frame with Stampin’ Dimensionals.
- Five sequins from a recent Paper Pumpkin Kit were scattered about the image panel.
I hope you enjoyed today’s project and please let me know if you have any questions.
Thank you for stopping by for a visit and have a great day!


|
|
|||
|
|
|
||
|
|
|
|
|
|
|
|
|
|
|
|
|
|
|
|
|
|
|
|
|
|
|
|
")
 Layering Designs")


")


- Card base: A2 top-folding 4-1/4 x 5-1/2, Sweet Sorbet CS.
- Mat 1: 4 x 5-1/4, Sweet Sorbet CS.
- Frame: Cut from largest Fabulous Frames, Basic White CS.
- Image panel: Inside piece from above frame cut.