Hi crafty people. Well, it's been a while since I've blogged or done much of anything but it seems like I'm busy 24/7, that's for sure. Today I decided to play in the My Favorite Things Wednesday Sketch Challenge 173 (MFTWSC173). I don't know if the "WSC" stands for Wednesday Stamp Club or Wednesday Sketch Challenge. Another really awful thing that happened is when I booted up my trusty Windows PC that's going on it's 7th year, I don't know what happened but I lost absolutely everything I had loaded on it, down to my video graphics and music. I suppose I will have to figure that out later on, which is going to be very frustrating as I had other tasks planned for today, but somehow I figure out what happened or be forced to learn this Mac I've had for 2-1/2 years without taking one single class. You can pay $99 at the Apple store and get free classes for one year and go in to take any class that you need and I need all of them. I have a ton of books that I have cracked open a few times but the learning curve is something I was not expecting at all. It's a BIG learning curve. I'm in a bit of a pickle right now. I think after I edit this video and get it up on You Tube, I will restore the computer back to yesterday and that's done the trick before. Wish me luck. All of the above means that this video is going to be generic of just the video, no intros, no music, nothing, and I'm bummed. Edited to Add: I did purchase Impression about a year ago and couldn't "get it," and today, I got it. I was able to put a watermark on my pictures. Yay! The downside is that all of the pictures are named "Impression" so that I don't know what I watermarked and the quality? I have no clue what happened but these pictures were lovely and white, not so dingy. Sounds like a TV commercial for detergent, doesn't it? I think I figured out the "trick" to that little problem. I just went back in and edited the photos and now they look like they did before but with my watermark on it. Now that's going to be a drag. I think what I will do is export to Impression first, watermark my pictures, send back to iPhoto to edit them and then post them. I have Apperature, but it's w-a-y above my head and there's only one paragraph in that entire 1000 page book that tells you how to watermark your image, and I'm talking like a 6-line paragraph. Frustrating.
Here's another card for my grandson, of course, although I do have a lot of others sketched out. I'm also working tirelessly on my Cindy B Designs Boutique and putting together some lovely kits for you to purchase. I am open now, but I want a fully stocked store on May 1. Mid June will be even better since I will be stocked up on Stampin' Up! products too and plan on doing class kits and product shares. I've been a Stampin' Up! demonstator off and on since 2007 and there has not been one time that I've used an entire 12 x 12 designer series paper package. Not one. I'm going to use one of my own product shares. No kidding.
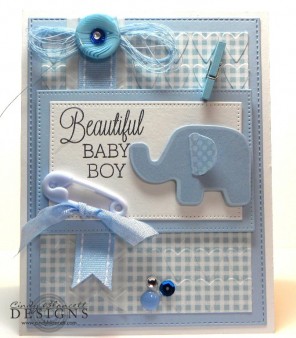
Today's card is just a super cute baby boy card and I went outside of my usual clean and simple style. The gingham is embossed with hearts using a single strip of hearts that I had to run through my Vagabond 9 times. I am super in love with the My Favorite Things Die-Namics that are stitched or pierced around the edges. It adds so much detail to any card and they come in all shapes and sizes. This is a totally monochromatic card and I rarely make those. I actually think this is my first one in almost 14,000 blog posts since 2007. That's 2000 blog posts in a year. I did share this blog with Christian Paper Crafts for a few years which I'm sure accounts for a lot of the posts.
I chose Papertrey Ink Spring Rain as my color. The base of my card stock is My Favorite Things Sweet Tooth and I also used this for my image panel. The gingham patterned paper is from Papertrey Ink Spring Rain Pattern Pack that I embossed with hearts. I used My Favorite Things Pierced Rectangle STAX and Fishtail Glag STAX. My vellum card stock was run though my Vagabond using Stampin' Up! Arrows dry embossing folder and I snipped a "V" in the Papertrey Ink Spring Rain Saddleback Stitch Ribbon. I also used a large Spring Rain Vintage Button by Papertrey Ink that had a lot of texture to it. I think it would have looked very fun if I had added Stickles to the button but my little bling on top of the button looks just fine. I also played around with some thread that perfectly matched the Spring Rain and made that into a bow and adhered it to the back of the button. I was able to use Liquid Glass as my adhesive to keep the vellum in place and added a few drops to the ribbon so it would stay down under the image and sentiment panel. For embellishments, I used Pretty Pink Posh Sequins and Avery Elle Sequins with a Doodlebug Enamel Dot. I clipped a light blue clothespin towards the right of my sentiment and image panel and a baby blue diaper pin at the bottom left of my sentiment and image panel. I found some Flourishes Light Blue Seam Binding Ribbon that was a perfect match for the rest of my card. I went tone-on-tone with my elephant image and die-cut him out using My Favorite Things Beautiful Baby Die-Namics. I stamped the elephant image a second time onto a piece of Spring Rain scratch paper and fussy cut out his ear, applied a very thin line of Liquid Glass to the front of his ear and adhered it to the other ear. I creased it up just a little bit so it looks like the ear is "flappy." I also used My Favorite Things Blueprints 13 to cut the Spring Rain Rectangle out. To put my card together, I adhered the Spring Rain panel to the Sweet Tooth card base and then adhered the gingham heart panel on top of the Spring Rain panel. I then put together my Fishtail Flag Banner with my Spring Rain Saddleback Stitch Ribbon. To put together my sentiment and image panel. I used the Pierced Rectangle STAX Die-Namics using Spring Rain for the larger panel and Sweet Tooth for the smaller panel. I die-cut out my elephant with Spring Rain Card Stock and stamped the coordinating image onto the die-cut using Spring Rain Ink for a tone-on-tone look. I stamped my sentiment using black ink at the very top left. I put foam dots on the back of my elephant image and adhered him to the sentiment and image panel and added his ear as described above. I tied a bit of Light Blue Seam Binding Ribbon by Flourishes into a knot at the bottom of the light blue diaper pin and adhered that to the sentiment and image panel with Liquid Glass. I added a few skinny lengths of foam tape to the sides of the sentiment and image panel and adhered this to my card. I then added my light blue clothespin at the top right of the panel and then added my other embellishments to finish the card. I love the way it turned out and think that it's just darling. Of course, I stamped the back of the card with my "grandma stamp." I will add a greeting inside of the card and write him a little note like I always do.
I hope that you enjoyed today's card. I need to clean up around here a bit and then get my ink on again since it's a gloomy and rainy day today, and that's the perfect crafting weather to me!
Thank you so much for stopping by to visit me today and God bless you!


Shop Cindy B Designs Boutique. You will love the experience! Simply click on the shopping bag above and enter a world of beauty hand-crafted for you.

Need Stampin' Up! products? Just click on the button above to shop with me 24/7 from the comfort of your own home!
Beautiful! Thanks for sharing!