Hello there my friends. I made a Christmas card. In September. In 105 degrees. This awesome card is for my design team work for the Paper Craft Crew. I used new products from the very cool Holiday 2015 Catalog, that is filled with spectacular goodies that are on trend and set a few along the way. I have a lot of favorite products, but in the Top 10 is this fabulous Season of Cheer Designer Series Paper that I will love forever. Just look at the beautiful watercolor Christmas bulb images on my card! There are several designer series paper that have a watercolor look to them in both current catalogs. I've been using more patterned paper on my work lately and appreciating the beauty it can bring to a project.
I'm still taking pictures with my iPhone and the quality and my current setup for taking pictures is not the best, so no justice is done for this card. The picture with the card lying on its side with the envelope truly represents the card's colors the best. For today's post, I've also included an Instruction List for you. The card might look a bit simple, and it is; however, it took a little bit of work. I think the end result was worth it. I don't know if this is necessarily a card that can be mass produced easily, but a lot of the assembly part can be done if you're waiting in a carpool line or watching TV.
We have a great sketch for you this week over at the Paper Craft Crew Challenge Blog. We would love to see your work and please take a look at the beautiful cards that the rest of the design team made.
Thank you so very much for stopping by today to visit me. I hope that you have a great day and God bless you!

Psalm 31:19-20.

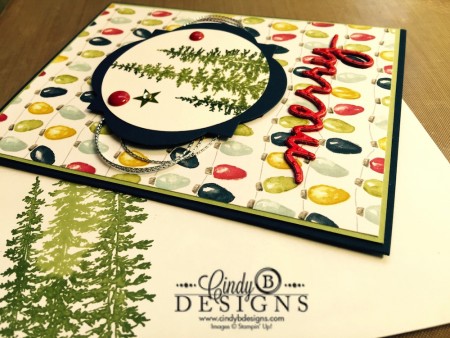
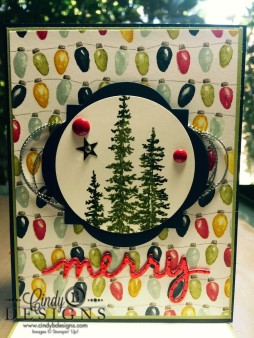
![]() Cardstock: Night of Navy card base, A2 left side fold; Pear Pizzazz cut to 4-1/8 x 5-3/8; Season of Cheer Designer Series Paper cut to 4 x 5-1/4. Adhere Pear Pizzazz and Season of Cheer to Night of Navy card stock base.
Cardstock: Night of Navy card base, A2 left side fold; Pear Pizzazz cut to 4-1/8 x 5-3/8; Season of Cheer Designer Series Paper cut to 4 x 5-1/4. Adhere Pear Pizzazz and Season of Cheer to Night of Navy card stock base.
![]() Stamp tree image from the Wonderland stamp set with Pear Pizzazz ink and use the rock 'n roll technique on the sides of the tree image with Mossy Meadow. Stamp onto a piece of Whisper White card stock, heat emboss using clear embossing powder, then punch out with a 2-1/2" punch.
Stamp tree image from the Wonderland stamp set with Pear Pizzazz ink and use the rock 'n roll technique on the sides of the tree image with Mossy Meadow. Stamp onto a piece of Whisper White card stock, heat emboss using clear embossing powder, then punch out with a 2-1/2" punch.
![]() Die-cut a window from the Framelits Window Frames Collection using Night of Navy card stock that will easily nest your tree circle image and adhere the image to the window frame. Adhere one small and one large Real Red enamel dot from the Home For Christmas Enamel Dots pack. Adhere an Old Olive star from the Brights Collection Sequin pack, then place a small Basic Rhinestone Jewel in the center of the star.
Die-cut a window from the Framelits Window Frames Collection using Night of Navy card stock that will easily nest your tree circle image and adhere the image to the window frame. Adhere one small and one large Real Red enamel dot from the Home For Christmas Enamel Dots pack. Adhere an Old Olive star from the Brights Collection Sequin pack, then place a small Basic Rhinestone Jewel in the center of the star.
![]() Put foam tape on the back of the image panel and make a thread nest with Silver Cording Trim. Since the cording trim comes on a roll, it basically makes the nest for you. Then adhere image panel with cording onto the card.
Put foam tape on the back of the image panel and make a thread nest with Silver Cording Trim. Since the cording trim comes on a roll, it basically makes the nest for you. Then adhere image panel with cording onto the card.
![]() Die-cut the word "Merry" from the Christmas Greetings Thlnlets 3x from Real Red cardstock and adhere on top of each other. Die-cut 1 more "Merry" from a Red Foil Sheet, then adhere on top of the Real Red card stock. Adhere the sentiment under the image panel.
Die-cut the word "Merry" from the Christmas Greetings Thlnlets 3x from Real Red cardstock and adhere on top of each other. Die-cut 1 more "Merry" from a Red Foil Sheet, then adhere on top of the Real Red card stock. Adhere the sentiment under the image panel.
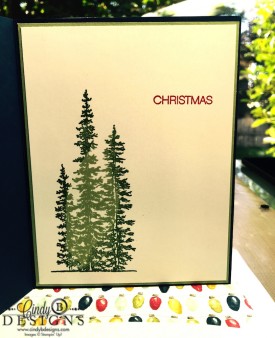
![]() For the inside of the card, cut a piece of Pear Pizzazz card stock to 4-1/8 x 5-3/8 and adhere a piece of Whisper White card stock on top cut to 4 x 5-1/4, then adhere to the Night of Navy card stock base.
For the inside of the card, cut a piece of Pear Pizzazz card stock to 4-1/8 x 5-3/8 and adhere a piece of Whisper White card stock on top cut to 4 x 5-1/4, then adhere to the Night of Navy card stock base.
![]() Stamp the trees from the Wonderland stamp set as described above using the same color inks and technique. Stamp the sentiment "Christmas" from the Holly Jolly Greetings stamp set in Real Red ink.
Stamp the trees from the Wonderland stamp set as described above using the same color inks and technique. Stamp the sentiment "Christmas" from the Holly Jolly Greetings stamp set in Real Red ink.
![]() Dress up your Medium Whisper White Envelope by stamping the trees again on the outside left and use a Framelit Envelope Liner to die-cut the bulbs from the Season of Cheer Designer Series Paper. Insert and adhere to the envelope.
Dress up your Medium Whisper White Envelope by stamping the trees again on the outside left and use a Framelit Envelope Liner to die-cut the bulbs from the Season of Cheer Designer Series Paper. Insert and adhere to the envelope.


Shop Cindy B Designs Boutique. You will love the experience! Simply click on the shopping bag above and enter a world of beauty hand-crafted for you.

Need Stampin' Up! products? Just click on the button above to shop with me 24/7 from the comfort of your own home!