Hello there and welcome to the Cindy B Designs Handmade Holidays 2016 Series! I am so excited that you have stopped by to visit me today.
I will be making cards and other projects from Stampin’ Up! and my other favorite stamp companies. I am an equal opportunity stamper, love the absolute creative freedom that it gives me, and there are so many beautiful images and techniques that I can’t wait to share with you! I’m also kicking around adding in my December Daily Album too. I plan to do videos of my projects too.
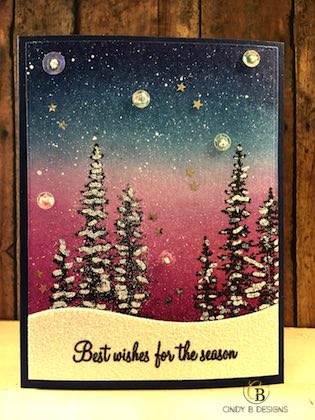
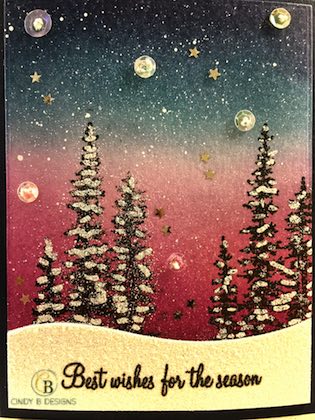
Today’s card is WAY out of my box. I even surprised myself with this one. I made my first galaxy, or night sky card and used Copic Opaque White to create my galaxy. I painted some onto an acrylic block, watered it down with a #6 paintbrush and then flicked it onto my card after my lovely Distress ink blending and stamping the Christmas Tree images from a stamp set released last year from Stampin’ Up! of Wonderland, that is, unfortunately, retired. It was one of those stamp sets that I refused to let go. It’s a beautiful stamp set that is timeless and classic. The smaller size paintbrush, the smaller splatter, or stars, you will get. I almost added a little touch of Black Soot Distress Ink, but was happy with how my galaxy turned out.
As I did use retired products on my project, shop your stash! I’ve been able to find an awful lot of images shopping my stash and I’m so happy that I have taken the time to do this before I start to destash again…and definitely be watching for more videos of at least 3x a week. I want to be decluttered a lot by the start of the New Year and will keep making videos until I am all cleared out. I do not make New Year Resolutions. I set goals. Decluttering is one of my goals for 2017.
I love how my “snow” turned out on the card’s Christmas Trees. I used a VersaMarker Watermark Pen to freehand draw snow on the tree branches and then applied WOW! Sparkling Snow Embossing Glitter. When you heat set this powder, it’s formulated so that you get a little puffiness and I really like that. There are a lot of other brands on the market to get the snow effect; however, I really liked the control I had using this method.
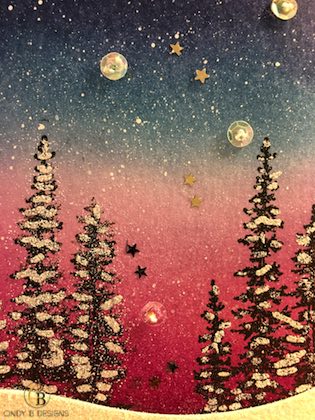
This is an almost 1-layer card with my side-folding A2 size Stampin’ Up! Night of Navy card base and a piece of Tim Holtz Distress Watercolor Paper cut down to 4 x 5-1/4. The Chipped Sapphire Distress Ink is a perfect match with my card base. I did my ink blending on the smooth side of the watercolor paper. I started with Seedless Preserves at the bottom and worked my way up with a lighter touch and added in Milled Lavender to blend in to my transition to Tumbled Glass. At the top of the watercolor card stock, I started with a deep and rich Chipped Sapphire to Broken China, then achieved a very nice blend with the Tumbled Glass and Milled Lavender. It turned out just perfect with a beautifully smooth transition, yet you are able to distinctly see the distress ink colors and blends. I was especially happy with how the blues and purples met in the middle for the fade.
I was absolutely thrilled that I was able to pick up the teeny tiny silver stars from Lucy’s Little Things Lucky Dip – Christmas Special, and adhere them to my card with a Quickie Glue Pen. This unique technique is to adhere those incredibly and unbelievably small stars and other embellishments to your card by using a Lifestyle Crafts/Silhouette/We R Memory Keepers Quick Stik/Pick Me Up Pen…they are all the same thing, by using the plastic flat end of the Quick Stik to place the embellishments. The static grabs right onto the teeny embellishments so that you can place them on your project after you’ve applied your adhesive of choice. Works like a charm. I have never put such small embellishments onto any of my projects before. I do highly recommend that you use a Swiffer Cloth to rub over your hands before undertaking this task. I also added some clear sequins to my card and applied Stampin’ Up! Dazzling Details in the middle of the sequins for a little extra shimmer.
My “snow bank” turned out awesome. I was able to heat emboss my sentiment onto a piece of Dazzling Diamonds Glitter card stock by Stampin’ Up! after I die-cut it with MFT Stamps Snow Drifts Die-Namics. I was sure to measure this out first for placement and used my MISTI to stamp my sentiment from Stampin’ Up! Holly Berry Happiness with VersaFine Onyx Black Ink 3x onto the glitter paper. I then sprinkled clear embossing powder over the sentiment and heat set it. I was extremely pleased with the results. I have no warping on this card, despite the tremendous amount of ink blending and heat embossing that I did.
I hope that you’ve enjoyed today’s card in my new series and please return soon! In honor of Christmas, I thought that it was only appropriate to give one of my lucky readers a gift. This giveaway is open to everybody! Since I do have international readers, I am able to offer you a $50 US Gift Certificate to any online store of your choice. Please check out my new Affiliates Page that will be up later this week. Being part of an affiliate program with various industry manufacturers allows me to be able to give you prizes, other fun giveaways, and maintain my blog by keeping operating costs under control. I’m also a very strong believer in supporting our industry by shopping at our favorite stores and stamp companies.
For every project in this series, which will clearly be marked in the post topic and the graphic at the top, leave a comment right here on my blog. At the end of the series, I will draw one lucky winner. You do not have to follow me, although it would be nice…we’re going to keep it simple and just leave a comment. We are all so busy this time of year and social media is not a super high priority right now. I would rather be doing other fun things personally 🙂
Thank you so very much for stopping by today to visit me. Have a great day and God bless! I really appreciate your support and look forward to a fabulous 2017 with you!

Product List
|
Dazzling Details
|
|||