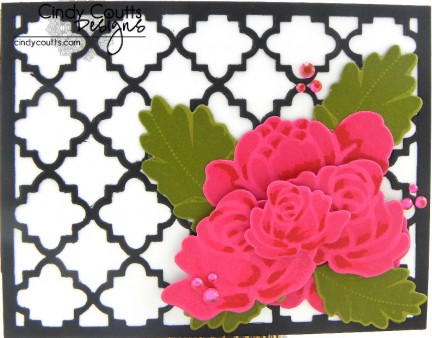
Good afternoon. While I was making this card, it wasn't really a learning process for me but there's a lot of information that I wanted to share with you that was brought to my attention specifically while making this card. I hope that you find these tips, tricks, and techniques helpful in your paper crafting.
The inspiration for my card was derived from Pinterest, where else? This is my inspiration picture and you can see how the Quatrefoil die-cut ties in with the vase and my flowers.
TIPS, TRICKS & TECHNIQUES
1. As the cover plate is a very intricately detailed die-cut, I always run it through my die-cutting machine 3x; once with the sandwich right side up and twice with it upside down. My sandwich order right side up using a ProvoCraft Cuttlebug is A Plate, B Plate, card stock with die-cut facing down, metal shim, and C Plate. I find the more weight the better on top and I always use a metal shim for clean lines. This method provides me with a perfect and precise cut and the inside pieces seamlessly fall out without damaging my plates, die-cut or shim. To adhere the cover plate, I put 1/8" adhesive tape around the edges and used a thin glue pen on the rest. This afforded me complete adhesion to my white base card stock without any glue seepage. I always peel off the backing of the adhesive tape before I use the glue pen so that it doesn't dry because you do want to get it down fast. When I do this my white card stock base is scored but not folded. This allows ease of placement.
2. I always use an alignment tool, such as a Stampin' Up! Stamp-a-ma-jig when using die-cuts for a perfectly centered image. I put a small amount of dotted repositional/temporary adhesive on the back of my die-cut and press it onto my workspace so the die doesn't move at all while using the alignment tool. The repositional/temporary adhesive rubs right off the back of the die-cut image and your workspace.
3. When doing tone-on-tone stamping, use black ink stamped onto the plastic sheet of your alignment tool for better visual clarity. I use black ink 99% of the time. My positioning turns out flawless this way.
4. After using die-cuts with red/purple hue card stock, clean your plates thoroughly as it will make its way onto your next project from the grooves in your cutting plates.
5. After each project, I thoroughly clean all work surfaces and tools.
Now, I would like to share my card with you. I hope that you like it and thank you so much for visiting me today. God bless you.


1. Cut a piece of white card stock to A2 size so that the crease is at the top.
2. Die-cut the cover plate onto black card stock placing a metal shim over the die-cut, remove the shapes from the card stock so that you have the frame only and adhere to the frame to the white card stock with 1/8" adhesive tape around the edges and a glue pen inside the edges.
3. Die-cut your flowers with raspberry card stock and your leaves with avocado card stock. Stamp on the coordinating images with the coordinating ink colors.
4. Arrange the leaves and flowers on the bottom right corner of the card building up with foam dot adhesive. Partially color in the flowers using markers.
5. Adhere various sizes of hot pink rhinestones onto the card.


Totally stunning xx
Gorgeous card, Cindy. Thanks for sharing the tips and techniques!
So beautiful, Cindy! Thank you for all the tips and extra instructions! 🙂
Beautiful job! What a sweet card.
Wow, this card is truly gorgeous and I will say thank you very much for the amazing tutorial.