Hello there! I hope you all had a wonderful Thanksgiving! It’s been so crazy busy around here that I hardly have time to color anymore and am down to one card a week. Some exciting news for me is that I was Spotted by MFT Stamps! It was THIS CARD that drew their attention. I’m very honored that my card was chosen.
I made this fun shaker card earlier this week and put it up on my Instagram. I just haven’t had the time to make a blog post yet, so here it is!

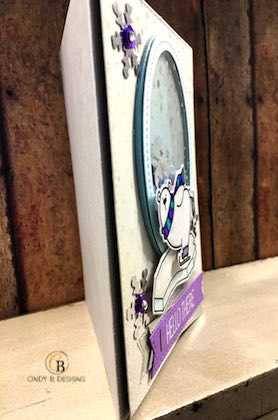
I used two MFT Stamps sets of Cool Day, which was released last year, and the new Polar Bear Pals. They worked perfectly together and this card has received more IG “Likes” than any other card I’ve posted. I’m very surprised over this as I could not quite grab the right lighting for this card at all and the picture does not do it justice. This card was an honest throw together and hope for the best kind of card. I was determined to color the fun polar bears for The Daily Marker 30 Day Challenge. There are a couple of things I’d like to share with you too. Here is a side view of the card. I have colored fun foam so from the side of a card where you use dark card stock, you don’t see this in your face white foam. That bothers me, a lot. It’s definitely a personal preference. I use colored fun foam a lot and especially when building up shaker cards. In this instance, I used my Sno Cone card stock to build up my shaker frame. Doesn’t the side view look so much better? You can also see how I built up my shaker frame using 5 Single Oval Stitch Die-Namics, inserting my shaker guts from 5 different Little Things from Lucy sequin mixes that played perfectly together (Snowflake, Snow Day, Silver Snowflake, Arctic Skies and Crystal) and looks gorgeous, with my acetate piece already having the “snow” printed on it and added a 6th oval on top.
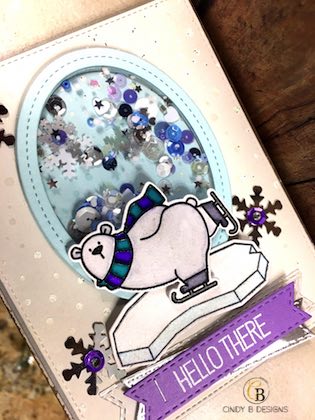
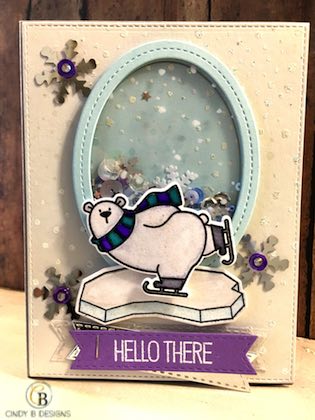
I started with an A2 Cement Gray side-folding card base and adhered black fun foam to the top. I then cut a piece of Grout Gray card stock with Blueprints 15. I then die-cut 6 Sno Cone Single Stitch Oval Die-Namics and saved the center pieces for another project. I sized up where I wanted my shaker window to be, adhered one of the center pieces to the Grout Gray card stock so that I could I stamp the Snow Background stamp onto the Grout Gray card stock with Versamark ink and then applied a new to me embossing powder of Ranger Snowflake Tinsel. I stamped my polar bear from Polar Bear Pals onto a piece of Bristol Smooth White card stock and colored him in with my Zig Clean Color Real Brush Markers using Pale Gray with Gray, Turquoise Green with Persian Green and Violet with Deep Violet. I used a silver 1 mm Zig Clean Color Silver Metallic Pen for the blades on the ice skates. The “iceberg” from Cool Day had already been colored and die-cut from a previous project and whatever I used for the side of the iceberg on the light blue part was very dark in the beginning. I was able to use my watercolor brush with clean water to pull off a lot of the color. After all of the color thoroughly dried, I hit it with my Tim Holtz/Ranger heat tool to get the low pure heat that I wanted to make sure that once I applied my Wink of Stella Clear Glitter Pen over the images, I would not reactivate the color. You just have to be careful and color in like colors at the same time and then wipe the brush out a little bit to get rid of the excess color that might be left on the brush so you do not cross-contaminate your colors.
For my sentiment and the banners attached to it, I used the Stitched Fishtail Banner Die-Namics and manipulated/customized them to the length that I wanted and to get a double-ended banner too. I cut my first banner from Grape Jelly card stock and heat embossed my sentiment from Polar Pals with white embossing powder. I cut another banner from silver foil card stock and the bottom banner from the acetate that I used for my shaker window, then attached all 3 banners together with my Tim Holtz Tiny Attacher. I placed Scor-Pal (or Be Creative) Tape on the back of the acetate banner and adhered it to the bottom of my card. I built up my shaker as described above, added foam squares to the back of the polar bear, then placed him on top of the shaker. I was playing around with my iceberg too so that everything was balanced, then I adhered that to the card. I added 3 large silver snowflakes for my visual triangle, purple sequins in the middle to tie in the sentiment banner, and 3 small rhinestones by Stampin’ Up! in the middle of the purple sequins and I was done!
It sounds and looks like a lot of work, but it really wasn’t. Planning as I went along is always a bummer, but then it started to come along just fine. I like my nontraditional colors and how I was able to tie them all together.
Thank you so much for stopping by to visit me today! One of my IG followers requested that I make a video for this card and I plan on doing that next within the next couple of days. I plan to focus on building up the shaker portion with card stock and how I was able to manipulate the Stitched Fishtail Banners, since one end of the banner is not notched for the flag cut.
God bless and have a great day!