Hello there! Thank you for joining me today for a Color & Contour Concept Art Card that is featured on page 158 of the new Annual Catalog, available to you on May 4, 2021.
This is another fabulous bundle with photopolymer DistINKtive 2-step images, fun scripty fonts, and coordinating die-cuts that consist of floral dies and the most incredible frame dies of large to small open scallops, scallops, dots, and dotted lines in various sizes that are perfect for layering, and another staple item for me; as well as the designer series paper of Pattern Party, which is a Hostess item. As you know, I’m a tremendous proponent of black and white staple designer series paper, and I finally got it!
As always, your Supplies are below, as well as a little peek into the Hostess Pattern Party Designer Series Paper. This is definitely a must-have item that you can earn with your Hostess Dollars.
This Concept Art Card was created with the Color & Contour Bundle, item 158356.
The Pattern Party 12 x 12 Designer Series Paper, item 15546, has color print on one side for a total of 12 patterns + black and white on the other side. This is a very large paper pack consisting of 48 sheets total with 4 each of double-sided patterns and is exclusive to our Hostess Stampin’ Rewards with a value of $30 that you can earn for FREE with an event in sales of $150 or more. This designer series paper is that easy to add to your staple timeless classics craft stash and well worth it. You will be seeing this DSP featured a lot over the next year.
The Pattern Party Designer Series Paper has our versatile color palette + In Colors of Petal Pink, Flirty Flamingo, Pale Papaya, Poppy Parade, Crushed Curry, Granny Apple Green, Pool Party, Misty Moonlight, Basic White, and Basic Black, in amazing patterns, such as stripes, dots, scallops, flowers, and everything in between.

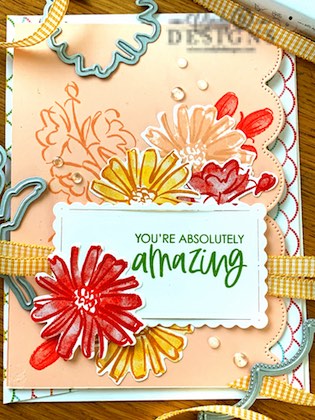
I started out with an A2 top-folding 4-1/4 x 5-1/2 Petal Pink card base. I die-cut in the dotted scallop edge from the coordinating Scalloped Contours Dies with the top of the scallop die lined up at the right side of the card base. A piece of Pattern Party DSP was cut to 1 x 5-1/2 was adhered to the inside of the card base to peek through the dotted scallop cut. I cut the inside Basic White panel to 4 x 5-1/4 and adhered to the almost far left of the inside of the card to retain the peek-through feature of the DSP.
I stamped 3 line art and 3 coordinating DistINKtive images onto Basic White CS of 2 in Crushed Curry and 1 in Poppy Parade, then die-cut. The full floral line art and DistINKtive image was stamped in Poppy Parade and also die-cut. The sentiment was stamped in Granny Apple Green ink onto a scrap piece of Basic White CS, then cut with the 2nd smallest scallop/line die from Scalloped Contours Dies.
I arranged the images and sentiment onto the card base and then tore a piece of Glad Press ‘n Seal to pick up the images to keep them in the place where I wanted to adhere. I laid the Glad back down on the card base then placed the bud and full floral images on top of the Glad where I wanted them positioned and picked up with a Clear Block. The bud line art and solid images were stamped in Flirty Flamingo with the full floral line art stamped in Petal Pink.
All images were adhered with Multipurpose Liquid Adhesive sans the sentiment panel and one of the Poppy Parade flowers. I cut a length of Gingham Bumblebee Ribbon and adhered this to the card base as shown with a little bit of Seal under the sentiment panel.
The sentiment was adhered to the card base with Stampin’ Dimensionals as one of the last steps in assembling this project. One of the Poppy Parade flowers was adhered to the top of the sentiment label with Multipurpose Liquid Adhesive and a Stampin’ Dimensional at the bottom of the image.
I scattered about several clear and white Elegant Faceted Gems around the card base to embellish.
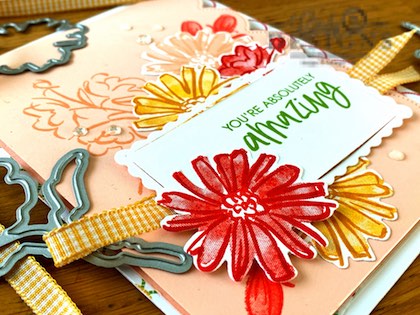
I achieved precision die-cutting with the 2-step stamping by placing a dot at the top of the line art image, solid image, and coordinating die-cut. When die edges are on the busy side, I always use this hack to save myself a lot of grief.
I hope you enjoyed today’s project. Thank you for stopping by for a visit and have a great day!


