Hello there! Thank you for joining me today for Stampin’ Up! Only Challenge 265, where we are celebrating winter.
I’m writing this post as it’s 55 outside, which is wonderful, but I still have January and February to get through. It’s going to be over 60 tomorrow and I’m really looking forward to that.
I shopped my stash and just played. I mixed the Annual Catalog, current Holiday Catalog, and new Spring Catalog for this project.
As always, your shopping list and measurements are below. Keep in mind that the majority of the products I used are up to 50% off right now at my online store.

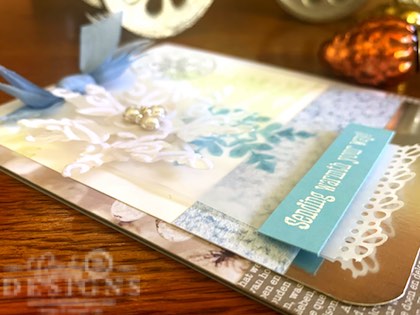
I started out with a Smoky Slate top-folding A2 card base. I layered on an A2 piece of Feels Like Frost DSP and cut a Smoky Slate Neutrals Print DSP to 3-3/4 x 1-1/2 to adhere at the bottom of the card. I then cut a piece of Whisper White CS to 3-3/4 x 5 that was corner-rounded at the bottom and layered on a piece of Silver Foil CS, also corner-founded with Sand & Sea DSP above the Silver Foil. I inked up the large Christmas tree from Winter Woods in Soft Sea Foam and stamped that off once to impress on the right side of the Whisper White image panel. I stamped the sentiment circle in Smoky Slate from Warm Hugs with a small snowflake in the middle from Snowflake Wishes.
I cut my vellum tag (measurements below) and used one of the Ornate Borders to crop the bottom of the tag. I stamped a large snowflake from Snowflake Wishes onto the vellum CS with Seaside Spray ink, sprinkled Clear Embossing Powder on top, and then heat set. The sentiment from Freezin’ Fun was stamped onto Seaside Spray CS and heat set with White Embossing Powder. I added Stampin’ Dimensionals on the back of the sentiment to adhere to the tag, as shown.
I die-cut 2 large snowflakes from So Many Snowflakes from Plush Poinsettia Specialty Paper and adhered them together by staggering the flakes with a Stampin’ Dimensional for dimension and adhered a Beaded Pearl to the center of the snowflakes with a Mini Glue Dot, which was adhered to the vellum tag with Multipurpose Liquid Glue. You can hide the glue behind the snowflake and heat embossed snowflake to adhere to the image panel.
I colored in Dark Seaside Spray with a Stampin’ Blend onto our Whisper White Crinkled Seam Binding, cut into 4 lengths, and make a junk bow, that was adhered to the top of the vellum tag with a Mini Glue Dot.
I hope you enjoyed today’s project and if you have any questions, please let me know. I wanted to marry a lot of texture, dimension, and color together for this card.
Thank you for stopping by for a visit. Have a great day and God bless.


Purchase your Stampin’ Up! products from my Stampin’ Up! Online Boutique from the comfort of your own home with direct delivery to your doorstep!

")
")
")


 Designer Series Paper")
 Designer Series Paper")


 Crinkled Seam Binding Ribbon")


")


- Card base: A2 top-folding 4-1/4 x 5-1/2, Smoky Slate.
- DSP panels: Covering entire card base; Feels Like Frost 4-1/2 x 5-1/2 with Smoky Slate Neutrals 6 x 6 DSP 4-1/4 x 1-1/2.
- Image panel: Whisper White 3-3/4 x 5 with Silver Foil CS 3-3/4 x 3/4; Sand & Sea DSP 3-3/4 x 1; Vellum Tag 2 x 4-1/2.
- Sentiment panel: 2-1/4 x 1/2 Seaside Spray.
Pretty layering! I always love the look of vellum added to a card! I know I have some but not sure where I put it! Better go on a search…