Hello there! Thank you for joining me today for a project where I created a sepia look using Cinnamon Cider ink on a Basic Black, Basic Gray, and Smoky Slate Halloween card with the Frightfully Cute Bundle and Well Defined holiday sentiment stamp set.
I CASE’d myself (copy and share everything) from this card and video to recreate this updated project. When you run out of MOJO, always look back through what you’ve created before to jumpstart you out of the rut. Works like a charm every time.
As always, your Supplies and Instructions are below. A Watercolor Pencil in Basic Gray with a Blending Pen was used, but left out of the Supplies.
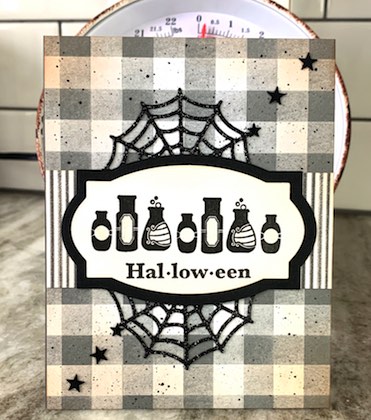
I started out with an A2 Basic Gray card base. I cut a piece of the Basic Gray gingham pattern from Peaceful Place Specialty Designer Series Paper to 4-1/4 x 5-1/2. I inked up Cinnamon Cider onto one of our Blending Brushes and inked the edges of the DSP to create a sepia look. To complete the vintage vibe I was going for, I splattered a little Basic Black Stampin’ Write Marker onto the DSP, then adhered this to the card base with Multipurpose Liquid Adhesive.
To create the symmetry of the focal point, I chose my image, sentiment, image panel die-cut, and image panel mat to do a little math so I knew how wide to cut the Basic Gray stripe pattern from Cute Halloween Designer Series Paper.
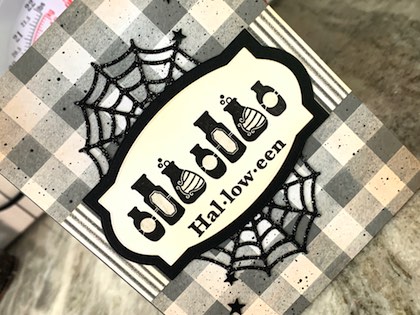
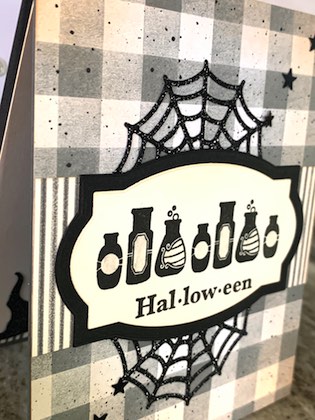
I stamped out my image panel onto Very Vanvilla CS with repeat potion bottle images in Memento Tuxedo Black ink at every 1-1/4 inches x 2 and masked off the last left 2 bottles with a Post-It Note then lightly colored in with a Basic Gray Watercolor Pencil and blended out with a Blender Pen. When I use this amount of black ink, I do heat set the image.
My favorite new sentiment set from the Holiday Catalog is Well Defined, which is shown below, that I masked off and stamped in Memento Tuxedo Black.
I cut the image panel out with the oval die from Hippo & Friends and a mat for this from Basic Black CS with the next size up die. Again, I used a Blending Brush inked up with Cinnamon Cider and went around the edges of the image panel, that was adhered to the Basic Black mat with liquid adhesive.
To assemble, I also used the sepia technique with the Basic Gray stripe pattern Cute Halloween DSP that I adhered to the center of the card base with liquid adhesive.
I then focused my attention on die-cutting the spider web from Frightful Tags Dies from a favorite carryover of Black Glimmer Paper. I cut this in half and adhered to the card base, one on each side of the striped DSP, with liquid adhesive. The image panel was adhered with Seal. Six Basic Black Cute Stars Adhesive-Backed Sequins were adhered to the card to accent.
I hope you enjoyed today’s project. Thank you for stopping by for a visit and have a great day!


|
| ||
| |||
|
|
| |
|
|
| |
|
| ||
|


")


 Specialty Designer Series Paper")


- Card base: A2 top-folding 4-1/4 x 5-1/2, Basic Gray CS.
- Card base mat: 4-1/4 x 5-1/2, Buffalo Check pattern from Peaceful Place Specialty Designer Series Paper.
- Cobweb die,
- Card base image panel mat: 4-1/4 x 1-3/4, Basic Gray stripe pattern, Cute Halloween Designer Series Paper.
- Image panel mat: Largest non-stitched frame from Hippo & Friends, cut from Basic Black CS.
- Image panel: Blending Brush Cinnamon Cider sepia effect.